Monthly Archives: February 2016

Finding class inside a bunch of jar

Many times there are some Java linkage errors and I have to find out in which jar files the class files are located. So this has lead me to find out tools which can do this job for me. I usually get the job done by using this excellent open source tools named Jar Explorer inside Github. It is basically a platform independent Swing based utility which allows you to recursively search inside Jar files located inside a folder for any class name String. So it is possible for me to search for a class named “LoggingEvent” inside a folder containing lots of jars and it outputs the list of all the jar files where it found classes containing the text “LoggingEvent”.

However when you are connected to Linux consoles using ssh and don’t have access to X Windowing system then you have to rely on either text based java program or pure vanilla shell scripting. For this situation I use the following snippets of code which I found from a Stackoverflow article.

On Linux/Mac
for i in *.jar; do jar -tvf "$i" | grep -Hsi ClassName && echo "$i"; done

On Windows
for /R %G in (*.jar) do @jar -tvf "%G" | find "ClassName" > NUL && echo %G
Using tput to label tmux panes

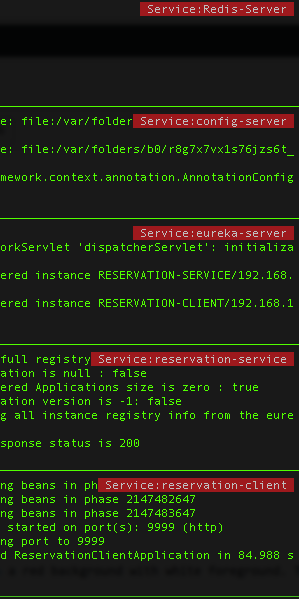
As I had pointed out in my post about tmux that now I am using tmux to configure and debug multiple servers inside a single window split into panes. Now I ran to another problem I always forgot which pane was meant for which service. Beyond 2 to 3 panes it was getting confusing to remember which pane is monitoring which service. So I remembered my previous post related to tput which allows anybody to show a running clock inside a linux terminal. So I decided to provision a small shell script to fix this issue. Basically I wanted a way to label each pane so that I could effortlessly identify the purpose of the pane inside tmux. So here is the code:

#!/bin/bash
#Display Service Name

function die {
echo "Dying on signal $1"
exit 0
}

function redraw {
local width length;
width=$(tput cols);
str=$1;
length=${#str}+10;
tput sc;
tput cup 0 $((width-length));
set_foreground=$(tput setaf 7)
set_background=$(tput setab 1)
echo -n $set_background$set_foreground
printf ' Service:%s ' $str
tput sgr0;
tput rc;
}

trap 'die "SIGINT"' SIGINT
trap 'die "SIGQUIT"' SIGQUIT

trap redraw WINCH;

while true; do
redraw $*;
sleep 1;
done

This shell script takes a parameter and shows it on the top right column in a red background with white foreground. This script should be invoked in this way.

./ShowTextInTerm.sh service-name &

Invoking this script in every tmux pane with relevant substitution for service-name is giving me this result:
Screen Shot 2016-02-11 at 1.59.55 pm

Please note that this script works well on my MacBook. I am yet to test it on a Linux terminal.

Using SSH to clone Git repository with multiple private keys

I prefer to use the multiple private keys and avoid using the same private key with multiple services. Recently I decided to switch from HTTPS based Git clone of my bitbucket repositories to SSH based Git clone. So created a new private key added them into bitbucket.org and then I expected that my git clone would work. But it didn’t.

git clone git@bitbucket.org:mybitbucketid/mygitrepository.git
Cloning into 'mygitrepository'...
conq: repository access denied.
fatal: Could not read from remote repository.

Please make sure you have the correct access rights
and the repository exists.

I knew I had to point the git client to my private key so I created the following entry in my ~/.ssh/config file.

Host bitbucketrepo
HostName bitbucket.org
IdentityFile ~/.ssh/bitbucket_private_key
User git

Now I felt it would work. I tried again and it still didn’t work.

git clone bitbucketrepo:mybitbucketid/mygitrepository.git
Cloning into 'mygitrepository'...
conq: repository access denied.
fatal: Could not read from remote repository.

Please make sure you have the correct access rights
and the repository exists.

Now I was confused as to why it was not working. On further research I found this link. Now I updated the entry in my ~/.ssh/config file to this.

Host bitbucketrepo
HostName bitbucket.org
IdentityFile ~/.ssh/bitbucket_private_key
IdentitiesOnly yes
User git

Now I tried again. This time it worked perfectly.

git clone bitbucketrepo:mybitbucketid/mygitrepository.git
Cloning into 'mygitrepository'...
warning: You appear to have cloned an empty repository.
Checking connectivity... done.

Well the addition of “IdentitiesOnly yes” line in my config file did the trick. It seems that when we do an SSH connection it’s default behavior is to send the identity file matching the default filename for each protocol. So if you have a file named ~/.ssh/id_rsa then that will get tried before your private key which in my case was ~/.ssh/bitbucket_private_key. So by using the “IdentitiesOnly yes” line I explicitly asked my ssh client to use my identity file and nothing else and it worked like a charm.

Awesome tmux

I have always found moving between tabbed interfaces cumbersome in my Mac terminal. Finally when debugging 7 different log files sitting on 7 different servers I felt enough was enough and started looking for a solution. Enter ‘tmux’.

tmux is a terminal multiplexer which supports multiple windows inside a single terminal session and allows me to create horizontal as well as vertical panes. So I can debug the logs sitting on different servers by tailing them in different pane and then still can have one pane dedicated for executing commands. I found a very good tutorial at this and this location.

Now I don’t want to go back to the old way of having multiple tabs for multiple logs. Agreed tabs in terminal have their own place and usage but for this particular case where I am doing development and debugging multiple servers I don’t have time for a tabbed interface instead ‘tmux’ is the way to go.